
This post may contain affiliate links, If you choose to buy through these links, I may receive a small commission at no additional cost to you.
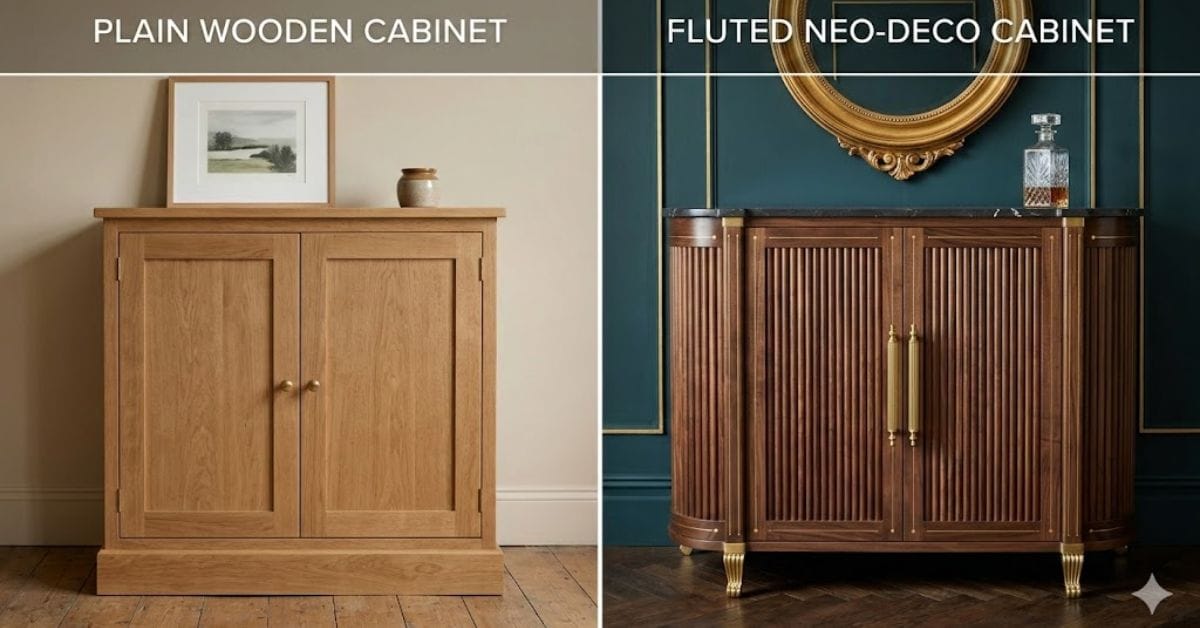
Stop spending thousands of dollars on designer furniture catalogs. If you’ve scrolled through Pinterest or Instagram lately, you’ve probably seen those stunning fluted coffee tables and brass-accented sideboards that look like they belong in a billionaire’s penthouse.
That’s Neo-Deco the evolution of Art Deco that’s taking the interior design world by storm. The good news? You don’t need a designer’s budget to get that look. You just need a little patience and the right DIY tricks.
In this guide, I’m going to show you how to turn basic, boring furniture into high-end Neo-Deco masterpieces using ribbed textures and metallic finishes. Trust me, once you finish these projects, your guests won’t believe you made them in your garage or balcony.
1. What is neo deco style?
Before we pick up a hammer, we need to understand the aesthetic. Neo-Deco is essentially a fresh, stripped-back take on the opulent Art Deco movement of the 1920s. While the original style was all about massive scale and intense detail, Neo-Deco focuses on Visual Calm.
It keeps the geometric precision, the soft curves, and the love for shiny metals, but it presents them in a way that fits a modern, minimalist lifestyle. It’s the perfect balance between high-end glamour and functional living. When we talk about Neo-Deco DIY, we are talking about creating furniture that feels architectural rather than just decorative.
Neo-Deco is essentially a fresh, stripped-back take on the opulent Art Deco movement of the 1920s.
2. Why is Everyone Obsessed with Neo-Deco and Ribbed Furniture Right Now?
Interior design trends move in cycles, and right now, we are moving away from flat, boring surfaces. People want texture. They want visual weight. Neo-Deco DIY is all about taking the glamour of the 1920s think bold lines and shiny metals and mixing it with modern minimalism.
The ribbed or fluted look adds a rhythmic pattern to a room that instantly makes it feel more expensive. Whether you are in a tiny apartment in Mumbai or a suburban home in Texas, this style fits perfectly because it brings a sense of order and luxury without cluttering the space.
If you want to keep your space organized before adding these textures, check out our guide on Minimal Home Decor Ideas for a Calm and Clutter-Free Space.
3. The Secret Ingredient: What Exactly is Ribbed Texture?
Before we jump into the how-to, you need to know what materials actually create that high-end fluted look. You don’t need a wood-turning lathe. Most pro DIYers are using:
Half-round decorative moldings: Available at any hardware store (Home Depot, Bunnings, or local timber marts in India).
Wooden dowels: Simple, round sticks of wood cut in half.
Pole Wrap: This is a flexible sheet of wooden slats : super popular in the US and UK for wrapping around curved furniture.
PVC Pipes: If you are on a super tight budget, thin PVC pipes cut in half and painted can mimic the look perfectly.
4. What is the 70 30 rule in design?
A major reason why some DIY homes look messy while others look like a magazine cover is the 70/30 rule. This rule suggests that 70% of a room should be in one primary style (usually your base furniture and wall colors), and the remaining 30% should be your accent style. For your Neo-Deco journey, your DIY ribbed pieces represent that 30%. By keeping the rest of the room simple, your fluted furniture becomes a focal point. If you try to make 100% of your furniture Neo-Deco, the room will feel overwhelming and lose its luxury appeal.
5. Step-by-Step: How to Make a DIY Fluted Coffee Table (The Viral Trend)
This is the project that most people are searching for. It’s the holy grail of Neo-Deco DIY.
Phase 1: The Base Construction You don’t have to build a table from scratch. Find a cheap, round builder-grade table or even a sturdy cardboard concrete form tube (Sonotube) from a construction supply shop.
Measure twice, cut once: Measure the height of your base. Cut your wooden dowels or moldings to the exact same length.
- The Glue Factor: Use a high-quality construction adhesive (like Liquid Nails or Fevicol HeatX). For a rock-solid bond that lasts, I highly recommend using Gorilla Heavy Duty Construction Adhesive as it is waterproof and perfect for gap-filling between your ribbed slats. Apply the glue to the back of each slat and press it firmly against the base.
3. Pro Tip: Use a piece of painter’s tape to hold the slats in place while the glue dries so they don’t slide down.
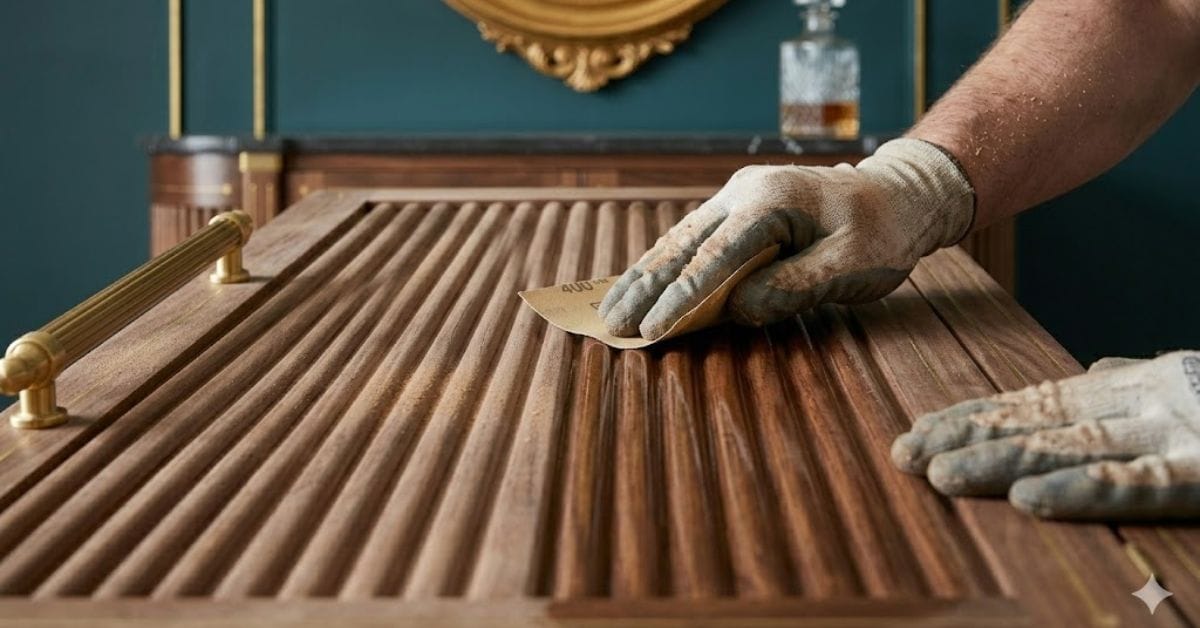
Phase 2: Sanding for that Designer Smoothness Raw wood looks cheap. Sanded wood looks like a $2,000 piece from West Elm. Start with 120-grit sandpaper and move to 220-grit for a buttery smooth finish. Don’t skip the gaps between the ribs!
6. What is the 3-5-7 rule in interior design?
Once your table is built, you need to style it. The 3-5-7 rule is a secret weapon for decorators. It’s the idea that grouping items in odd numbers : specifically three, five, or seven : creates more visual interest than even numbers. On your new ribbed coffee table, try grouping three items: a tall textured vase, a medium-sized candle, and a small metallic tray. The odd numbers force the eye to move across the arrangement, making the space feel more dynamic and professionally curated.
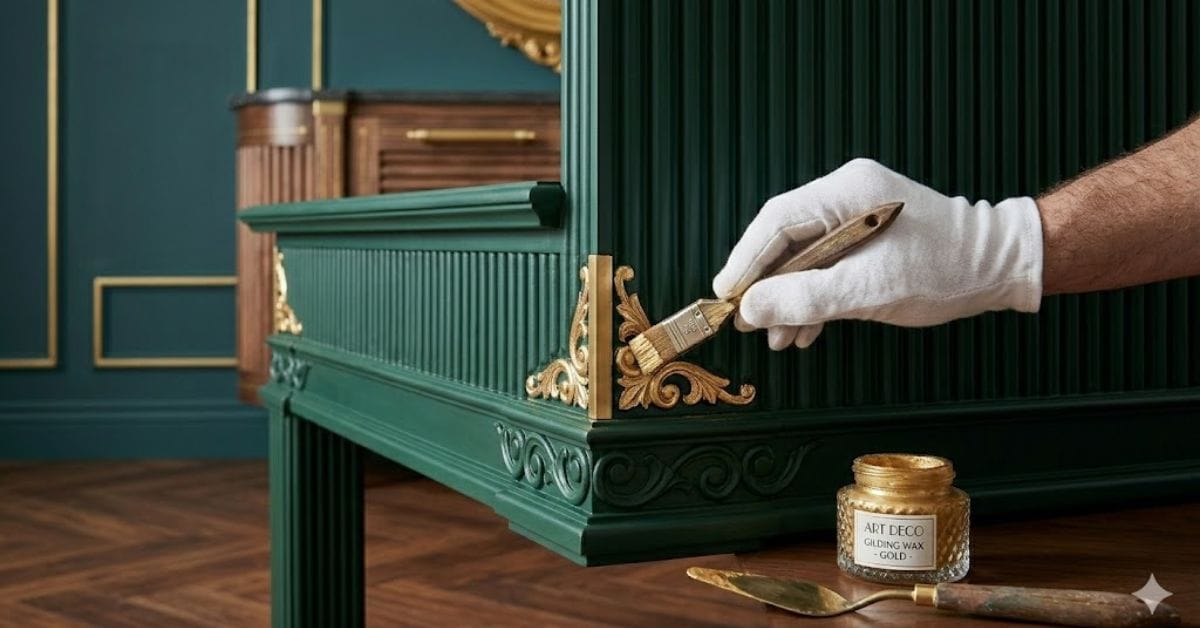
7. Adding the Deco Magic: Metallic Accents That Don’t Look Cheap
Neo-Deco isn’t complete without a bit of shine. But be careful : there is a thin line between elegant gold and tacky yellow plastic.
The Gilding Wax Secret: Instead of using basic spray paint, look for Gilding Wax (like Rub ‘n Buff). You apply it with your finger or a soft cloth. It contains real metal particles, so it catches the light exactly like solid brass or copper.
Where to add metallic accents:
The very bottom kick plate of your table.
The drawer handles or knobs.
A thin strip along the edge of the tabletop.
If you are looking for a smooth, high-shine finish, the FolkArt Metallic Treasure Gold Paint is an excellent, easy-to-apply option for all your DIY Neo-Deco projects.
8. What is the 3 4 5 rule for decorating?
The 3-4-5 rule is slightly more technical but very useful for Neo-Deco layouts. It often refers to a balance of elements: 3 colors (60% dominant, 30% secondary, 10% accent), 4 different textures (like your ribbed wood, the metallic shine, a smooth tabletop, and perhaps a rug underneath), and 5 points of light in a room. When you follow this, your DIY project doesn’t just sit in a corner : it integrates into a professional-looking environment. For Neo-Deco, making sure you have those 4 distinct textures is what makes the ribbed look pop.
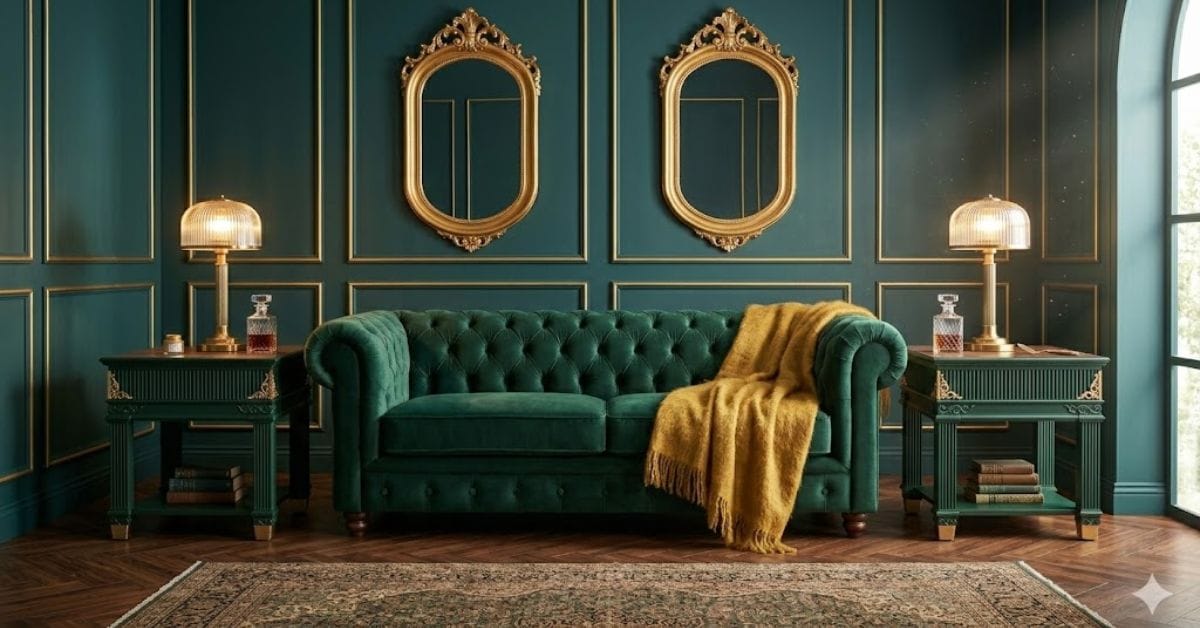
9. High-End Color Palettes
To make your Neo-Deco DIY look authentic, you need to pick the right colors. Avoid basic white if you want that luxury feel. Try these instead:
Deep Forest Green and Burnished Gold : Very sophisticated and classic.
Terracotta and Warm Copper: Perfect for a modern, earthy vibe (very popular in India and Australia right now).
Champagne and Silver: For a clean, Quiet Luxury aesthetic.
Midnight Blue and Chrome: Bold, masculine, and very New York Penthouse.
For those who love these earthy and warm tones, you will find more inspiration in our Low Budget Rustic Decorating Ideas for Warm and Inviting Homes.
10. Common DIY Mistakes: Why Some Projects Look Cheap
I’ve seen a lot of these projects go wrong. Here is how to make sure yours looks professional:
Uneven Gaps: If your slats aren’t perfectly vertical, the whole piece will look crooked. Use a level tool for every fifth slat you attach.
Visible Glue: If glue seeps out between the ribs, wipe it off immediately with a damp cloth. Once it dries, you can’t paint over it properly.
Cheap Paint: Use a Satin or Eggshell finish. High-gloss paint shows every single imperfection and bump in your DIY work.
Budget Breakdown: High-End Look vs. DIY Cost
| Feature | Designer Price (Retail) | DIY Cost (Estimated) |
| Fluted Sideboard | $1,500 to $3,000 | $120 to $200 |
| Ribbed Coffee Table | $800 to $1,200 | $60 to $100 |
| Metallic Accent Mirror | $400 | $30 |
11. How to Style Your Neo-Deco Pieces
Once you’ve finished your masterpiece, don’t just leave it in a corner. Neo-Deco thrives on Symmetry.
The Power of Pairs: If you made a ribbed side table, try to make a second one. Flanking a sofa with two identical DIY pieces creates an instant hotel lobby feel.
Lighting is Everything: Place a lamp near your ribbed furniture. The shadows created by the valleys in the texture will make the piece look 3D and incredibly expensive at night.
The Verdict: Is Neo-Deco DIY Worth the Effort?
Absolutely. Unlike some DIY trends that feel crafty or like a school project, Neo-Deco DIY focuses on structural changes and high-quality finishes. Even if you are a beginner, starting with something small : like a ribbed vase or a small fluted pedestal : will give you the confidence to move on to bigger furniture.
The best part? You are saving hundreds (if not thousands) of dollars while creating a home that reflects your specific taste. It’s more than just a piece of furniture; it’s a statement that starts a conversation.
What do you think? Are you ready to try the fluted look on an old IKEA cabinet, or are you going to start fresh with a new build? Let me know in the comments if you need a specific list of the best glues or paints available in your country!