
This post may contain affiliate links, If you choose to buy through these links, I may receive a small commission at no additional cost to you.
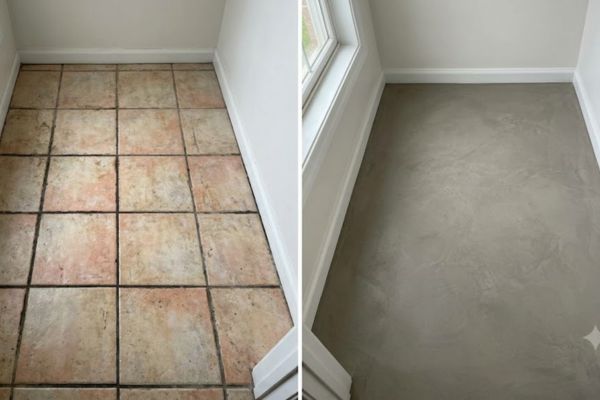
That tiny half-bath downstairs was driving me crazy. The floor had these gross, muddy-looking square tiles from back in the 90s, and no matter how much bleach I dumped on them, the grout stayed pitch black. I tried wire brushes, tile pens, everything. Nothing worked.
So I called a couple of local flooring guys. Big mistake. One guy literally peeked in, didn’t even measure, and tossed out nineteen hundred bucks. Another sent an email asking for $2,300. For fifty-five square feet! Once you add dumpster rentals and ripping out baseboards, that’s crazy money. I told them to forget it.
That’s when I decided to just try diy microcement directly over the tiles myself. No sledgehammers, no concrete dust all over the house, and no skip blocking the driveway. Total bill at the local trade desk was roughly $136, and by Sunday night, the floor was sealed and done.
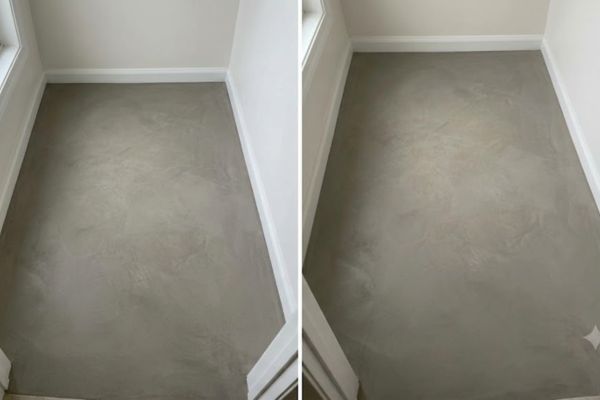
It honestly looks like a single slab of warm, matte stone now. If you want to tackle your own diy microcement project without going broke, here’s the real breakdown of what I bought, what I did, and what mistakes you should skip.
1. What Is Microcement, Anyway?
Don’t let the fancy name fool you. You don’t need an industrial mixer.
Microcement which you’ll usually find on bottom shelves as feather-finish compound is just ultra-fine cement blended with acrylic resins.
That resin is the trick. Standard bagged concrete turns to loose dust if you spread it thin. This stuff doesn’t. It cures rock-hard at barely two millimeters. That is why choosing a proper diy microcement system makes so much sense for indoor upgrades.
It sticks onto:
Old ceramic and porcelain tiles
Subfloor plywood and cement boards
Raw concrete slabs
Drywall or old laminate counters
Best part? Because it’s so thin, your door won’t rub against the floor, and you don’t get a weird step when walking in from the hallway.
If you love affordable home upgrades that turn raw, salvaged materials into high-end features, check out my step-by-step walkthrough on how to build a pallet garden for another weekend project you can finish on a shoestring budget.
2. Does It Actually Stick to Slick Tiles?
Yes, but only if you don’t skip the bond coat.
If you just mix powder with water and slap it over glossy tiles, it’ll peel off in big sheets in a few weeks. Tile glaze has no grip at all.
You fix that with two things: a rough quartz primer and mesh tape.
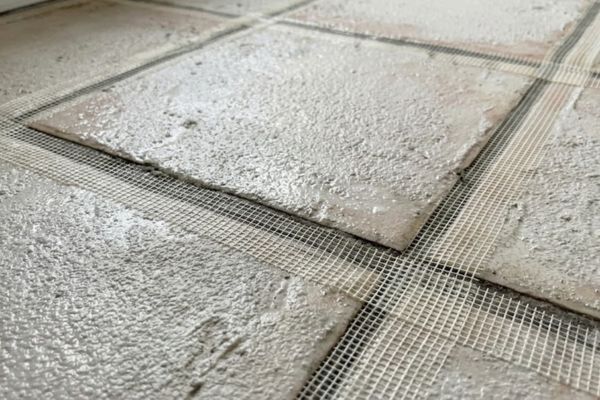
The quartz primer rolls out milky and dries like heavy 40-grit sandpaper. That gives the wet mix something to bite into. Then you put fiberglass tape over the grout joints so minor house shifts don’t turn into cracks later.
Materials & Cost Breakdown
Skip the overpriced kits online. Just walk into your local hardware or trade supply shop and grab this stuff:
| Item | Purpose | Cost |
| Ardex Feather Finish or Henry 549 (2 bags) | Core microcement powder | ~$44 |
| Quartz Bonding Primer (1 quart) | Sandpaper grip over slick tile | ~$23 |
| Fiberglass Mesh Tape (1 roll) | Bridges the grout dips | ~$12 |
| Matte Polyurethane Sealer (1 quart) | Waterproofing and stain protection | ~$33 |
| Pool Trowel (curved edges) | Stops trowel lines while spreading | ~$16 |
| Sanding Discs (80, 120, 220 grit) | Smoothing and burnishing | ~$8 |
| Total Cash Spent | ~$136 |
3. Getting the Subfloor Ready
This part sucks, but if you rush it, the floor will fail.
Walk around with a screwdriver and tap the tiles with the plastic handle. If you hear a hollow rattle, that tile came loose. Pop it out, scrape the old glue, and patch it flush with quick-set cement.
Then scrub the floor with a strong degreaser or TSP substitute. Old body oils, shampoo drips, and mop waxes will kill your bond. Mop it twice with fresh water and let it bone dry.
Once dry, run a sander with 60-grit paper over the floor. You aren’t grinding the tile away just scuffing the shine so it looks dull.
4. Putting Down the Primer and Mesh
Roll the quartz primer over the floor with a regular paint roller. It goes on milky white, but after an hour or two, it turns into gritty sandpaper.
While it’s drying, stick your mesh tape right over all the grout lines. Press it flat. That stops ghosting where old tile lines show up as faint shadows through the cement later.
5. Troweling the Base Mud
Mix small batches. This stuff sets via chemical cure, so you only get about 15 minutes before it hardens in the pail.
Mix about a third of a bag with cold water until it feels like smooth pancake batter.You can refer to the official Ardex Feather Finish specifications for the exact water-to-powder ratio so it doesn’t seize up before you finish your row.
Start at the far corner and work back toward the door. Hold the curved trowel at a slight angle and spread it out in broad arcs. (I recommend using the Marshalltown MPB14SSD 14-inch Pre-Worn Stainless Steel Plasterers Trowel because its pre-shaped rounded edges glide cleanly without gouging wet cement). Press down firmly to push mud through the mesh and into the grout dips.
Keep it thin about one millimeter. Don’t worry about minor lines right now; you’ll sand them later. Let it dry for 3 to 4 hours until the dark gray turns pale.
6. The Finish Skim and Burnishing
Take 80-grit paper and quickly knock down any high ridges or bumps from that first pass. Vacuum the floor thoroughly.
For the second coat, mix the mud slightly runnier like heavy cream.
Hold your trowel tighter against the floor this time. You’re scraping the blade hard against the first coat to fill in tiny pores. The friction against the fine sand creates natural cloudy swirls and stone-like tones.
Shut the door, keep the cat out, and leave it alone overnight. Once you see the burnished texture dry, you realize how rewarding a diy microcement makeover really is.
7. Sanding Down to Silk and Sealing
The next morning, the floor will feel rock-solid.
Run 120-grit paper over the whole thing, then finish with 220-grit. The 220 makes it feel like smooth, honed stone.
Vacuum three times. Then wipe the entire floor with a damp microfiber cloth to pick up every bit of dust. If you leave dust behind, the sealer will peel off.
Raw microcement behaves like chalk. Spill coffee or soap on it unsealed, and it soaks right in. Sealing is not optional.
Get a water-based polyurethane sealer in matte. Gloss looks cheap and plasticky; matte looks like real stone.
Roll on three thin coats using a short-nap roller. Don’t dump a puddle; heavy coats leave cloudy bubbles. Wait about two hours between coats.
Stay off it in socks for 24 hours, and give it three full days before putting heavy stuff back in.
To lock out moisture without clouding the color, I used a quart of Varathane Water-Based Ultimate Semi-Gloss Polyurethane because it dries fast, resists daily scratches, and gives a clean, crystal-clear protective barrier across the cured floor.
4 Big Mistakes to Avoid
Mixing too much mud at once: The bucket heats up, and in 15 minutes, you’re holding a twenty-pound solid rock.
Using a square drywall knife: The sharp corners dig deep grooves that take hours of hand-sanding to fix. Get the curved pool trowel.
Skipping the grout tape: Leaving tile gaps raw is how you get hairline cracks later.
Cleaning with vinegar: Never use vinegar, bleach, or harsh acids on this floor. It eats the sealer. Stick to warm water mixed with a few drops of gentle dish soap.
Upgrading old, outdated spaces without tossing tons of demolition debris into landfills is one of the easiest ways to build a more mindful living space. If you want more practical ways to create an eco-friendly living environment on a budget, take a look at my favorite simple sustainable lifestyle changes at home that you can start right away.
FAQ
Q1: How to apply microcement on floor?
Prep the base by degreasing, patching loose spots, and scuffing tiles with 60-grit paper. Roll out quartz primer and tape over grout lines. Trowel a thin base coat, let it dry for 3 hours, knock down ridges, and trowel a tight finish coat. Sand with 120 and 220 grit, clean the dust, and roll three coats of matte polyurethane sealer to wrap up your diy microcement installation.
Q2: What is the average microcement flooring price?
Hiring a contractor in the US, UK, or Canada usually runs $15 to $25 per square foot (£90 to £160 per sq m) because of labor. In India, pro quotes range around ₹250 to ₹600 per square foot. Doing it yourself with trade materials drops your cost to $1.00 to $2.00 per square foot (₹90 to ₹160 per sq ft), meaning small bathrooms cost well under $150. A diy microcement build keeps 80% of that budget in your own pocket.
Q3: Microcement floor vs polished concrete: What is the difference?
At just 2 to 3 mm thick, microcement is a lightweight coating applied straight over existing tile, timber, or screed without messy tear-outs or structural load concerns. Polished concrete is a massive slab (3 to 4 inches thick) poured from concrete trucks, requiring heavy grinding machines and expansion cuts to stop cracking. Microcement is completely seamless.