
This post may contain affiliate links, If you choose to buy through these links, I may receive a small commission at no additional cost to you.
Ever scrolled through Pinterest, spotted one of those crystal-clear acrylic side tables, and immediately cringed at the price tag? Believe me, I’ve walked down that exact same road more times than I care to admit. A genuine designer Lucite table can easily blow a $400 hole in your pocket. Honestly, it’s just wild. When you actually sit down and look at it, you’re basically just paying a massive premium for a beautiful piece of high-grade plastic.
So, I had this thought. Why not just make the damn thing myself? Turns out, it’s actually pretty simple. You don’t need a massive workshop or crazy expensive power tools either. If you want that high-end look without burning through your savings, learning how to build DIY Acrylic Side Tables is the ultimate budget hack to get that exact Lucite look under $30—minus the stress or ruined walls.
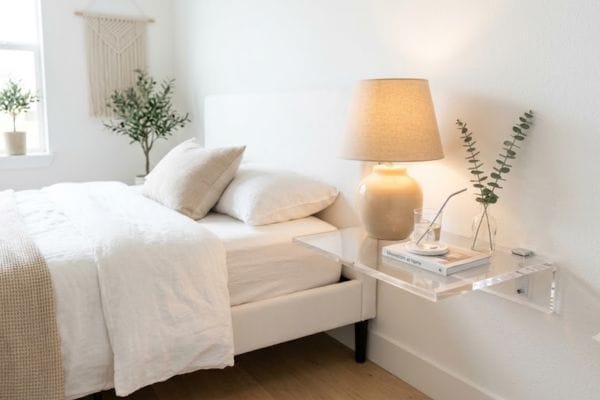
1. Why are Acrylic and Lucite Tables So Expensive Anyway?
Walk into any high-end furniture store and they’ll start throwing around big words like “Exclusive Lucite.” Here is a quick insider secret: Lucite is just a brand name for high-quality acrylic. That’s all it is. It’s like saying Kleenex when you just mean a regular tissue. Both materials give you that invisible, super clean “floating” look that designers love using to make tiny, cramped rooms look twice as big.
When a piece of furniture is totally clear, light passes right through it. Your eyes don’t register it as extra visual clutter taking up floor space. That’s why high-end DIY Acrylic Side Tables are trending everywhere across the US, UK, India, and global decor feeds right now. But instead of paying for a fancy designer markup, we are going to grab some thick, clear acrylic sheets from a local plastics shop or online retailer to get the exact same luxury vibe.Honestly, beating the luxury market system at its own game is the best feeling. For more eye-opening tips on this, read my raw breakdown on The Great Wealth Deception: Why the World is Buying ‘Rich’ While I’m Living a $100k Reality on a $40k Budget.
2. Is it Cheaper to Buy Acrylic or Make Your Own Furniture?
Making your own wins hands down. Every single time. A pre-made small acrylic shelf or a basic side table online will easily run you anywhere from $80 to $250.
Sourcing the raw acrylic sheets yourself cuts that cost down to almost nothing. The main trick to keeping this project under $30 is avoiding expensive custom cutting fees. Just buy standard, pre-cut acrylic panel sizes online or from a local distributor, and then grab some smart hardware to mount them up. If you love this kind of thrifty, resource-savvy approach to crafting, you should also take a look at our Zero Budget Gardening: Beginner Guide Using Recycled Materials to extend your DIY skills out into the yard.
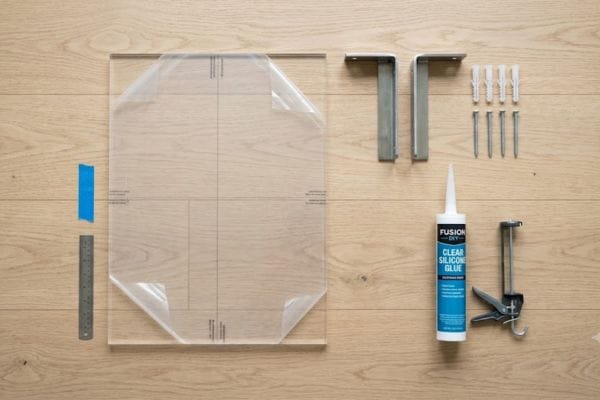
3. Materials Needed for a $30 DIY Acrylic Floating Table
To keep this setup sturdy and completely seamless, your shopping list is actually pretty short:
1 Thick Clear Acrylic Sheet: For this project, you can get the best results by using these heavy-duty (10 Pack) 8″ x 10″ Plexiglass Sheets 1/4 inch Thick (6mm), Clear Acrylic Sheets Panel Cut to Size Plexiglass Acrylic Board which are perfect to cut with an engraver, power saw, or hand tools. Grab a sheet that is at least 1/4-inch (6mm) or 3/8-inch (10mm) thick so it won’t sag under a heavy mug.
2 Invisible Heavy-Duty Wall Brackets: For providing completely invisible and heavy-duty support to your floating setup, you can use these (24 Pieces Adhesive Shelf Bracket, Punch Free Reinforced Design Shelf Support Pegs for Shelves Kitchen Cabinet Book Closet – Large Size) which allow a completely drill-free installation. They do the job best without ruining your rental walls.
3 Heavy-Duty Wall Anchors and Screws: Don’t skip these unless you’re lucky enough to screw straight into a wall stud.
4 Clear Silicone Adhesive or Epoxy: To bond the acrylic to the metal brackets without showing ugly glue lines.
5 Painter’s Tape: To stop accidental scratches during the install.
4. Step-by-Step Guide: Building Your Invisible Lucite Side Table
Let’s get down to the actual building part. It’s a quick weekend project that takes less than an hour of real work.
Step 1: Prep the Acrylic and Avoid Scratches
Acrylic looks amazing, but it picks up scratches if you just look at it wrong. When your sheet arrives, it will have a protective plastic or paper film stuck to both sides. Leave that film on for now. Keep it covered while measuring and test-fitting everything on the wall. Running some painter’s tape along the raw edges gives you a nice safety net while working.
Step 2: Put Up the Wall Brackets
Hold your brackets up against the wall exactly where you want the table right next to your bed or sofa. Use a leveling tool because if it’s even a little crooked, your morning coffee is going to slide right off. Mark the spots with a pencil, drill your pilot holes, tap in the wall anchors, and screw the brackets down tight.
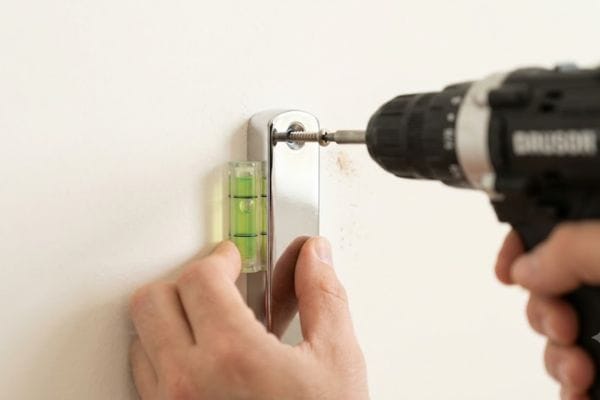
Step 3: Mount the Acrylic Panel
Now, peel back just the outer edges of the protective film from your acrylic sheet. Run a small, clean bead of clear silicone or epoxy right onto the top flat part of the wall brackets. Press the acrylic sheet firmly down onto the glue. Use a few strips of painter’s tape to clamp the sheet tightly against the brackets while the adhesive sets up.
Step 4: The Final Look
Leave the glue alone to cure for a full 24 hours. Once it’s completely dry, pull off the painter’s tape and peel away the remaining protective film. Step back and check it out you’ve got beautiful DIY Acrylic Side Tables that look incredibly high-end.
5. How Much Weight Can a Floating Acrylic Shelf Hold?
It’s the number one question on everyone’s mind before they even buy the materials. Nobody wants their phone or decor pieces smashing onto the floor at 2 AM.
How much it holds comes down to two basic things: how thick the acrylic is and how well you anchored it to the wall.
Use a 1/4-inch thick sheet mounted properly into wall studs or good drywall anchors, and your floating table will easily hold 10 to 15 pounds (4.5 to 6.8 kg) without an issue.
That’s plenty of strength for a phone, a small lamp, a drink, and a book.
Just don’t go putting heavy ceramic pots or giant stacks of textbooks on it.
6. Styling Tips for a High-End Minimalist Look
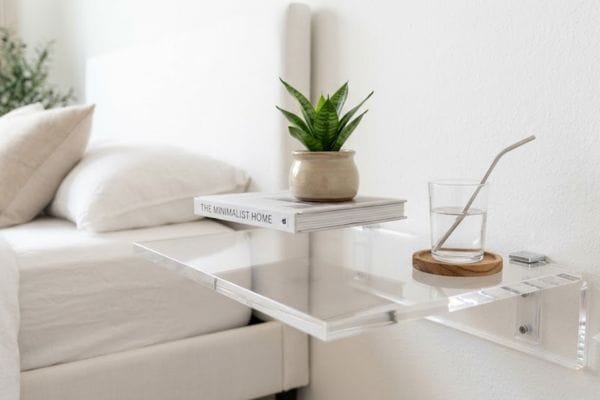
An invisible table looks best when you style it with a bit of purpose. Since the surface is totally clear, whatever you put on top looks like it’s just hanging out in mid-air. Here is how to make it look like a designer styled it:
Mix in Warm Textures: Break up the cool, glassy look of the plastic with natural textures. A raw wood coaster, a textured ceramic candle holder, or a small woven cotton mat works beautifully.
Hide the Cords: If you put a lamp on it, use clear cord clips to run the wire neatly down the corner of the wall so you don’t break the floating illusion.
- Use Shiny Accents: A brass dish or a matte black object sitting on that clear surface gives it an instant boutique hotel feel.
7. How Do You Clean Clear Acrylic Furniture Without Scratching It?
Once the table is up, you have to keep it free from smudges and dust without ruining the shine. Cleaning acrylic isn’t like cleaning a regular glass window.
Make sure to completely avoid Windex or any harsh ammonia-based cleaners. Those chemicals eat into the plastic over time, making it look cloudy, hazy, and permanently ruined.
Ditch the paper towels and rough rags. They carry tiny coarse fibers that leave micro-scratches behind.
The Safe Way: When maintaining handmade DIY Acrylic Side Tables, grab a clean, super-soft microfiber cloth, dampen it with warm water and a tiny drop of dish soap, and wipe gently in straight lines. To stop static from attracting dust, you can also check out the official acrylic cleaning guidelines on Novus Polish (or use a cheap bottle of Novus No. 1 cleaner) which works wonders for keeping the plastic crystal clear.
FAQ :
Q1: How do you make lucite?
A: You can’t really whip up Lucite in a kitchen because it’s a heavy chemical process. Factories make it by mixing specific liquid chemicals (monomers) with a catalyst under high heat. This creates a reaction called polymerization, turning the liquid into a solid, crystal-clear block of resin. For home DIY projects, it’s way easier to just buy manufactured, pre-cut acrylic sheets and shape them yourself.
Q2: How to make acrylic furniture?
A: Building custom furniture like DIY Acrylic Side Tables usually involves cutting, heating, and bonding the pieces. You start with a thick sheet (around 1/4 to 1/2 inch thick). To shape it, you run a DIY strip heater or a heavy heat gun along the edge to soften the plastic until it’s flexible enough to bend into clean corners. To stick pieces together, you don’t use regular superglue you use a special acrylic solvent cement (like Weld-On 4) that chemically fuses the two plastics into one seamless piece.
Q3: How to make an acrylic frame?
A: Making a floating acrylic frame is a super easy weekend project.
Cut two matching pieces of clear acrylic that are roughly 2 inches wider than your photo.
Sandwich your picture right between the two plastic sheets.
Clamp them together and use a drill bit made for plastic to slowly drill a hole through all four corners.
Pop some metallic wall standoffs through the holes, screw them into the wall, and you have a sleek, modern frame ready to go.