
This post may contain affiliate links, If you choose to buy through these links, I may receive a small commission at no additional cost to you.
Honestly, let’s talk about that “Pinterest envy” we all get.
You know what I mean: you’re scrolling through your phone, looking at these gorgeous luxury homes with sofas that look so soft and expensive, and then you look at your own living room and just… sigh.
It feels a bit empty or just “meh,” right?
I’ve been there so many times, thinking I needed a few lakhs in the bank to make my place look like a magazine cover.
But guess what? I found a secret.
You don’t need a designer or a huge budget.
Most people think you need a massive bank account to get that ‘designer look,’ but that’s a total myth.
(If you want to know more about how I manage to live a high-end life on a small budget, check out my guide on The Great Wealth Deception: Why the World is Buying ‘Rich’ While I’m Living a $100k Reality on a $40k Budget
And no, you don’t need to be a pro at sewing.
I’m going to share 10 simple hacks I’ve used to “cheat” my way to a rich-looking home without spending much at all.
Why Does My Living Room Feel a Bit “Cheap”?
Before we start, let’s be real : why do some DIYs look bad?
I’ve realized it’s usually because we use thin, shiny fabrics that look like a school craft project.
To get that luxury home look, it’s all about the “weight” and the “feel.”
Expensive homes use big, heavy, and textured layers.
If your decorative pillows are small and flat, they’re actually killing your room’s vibe.
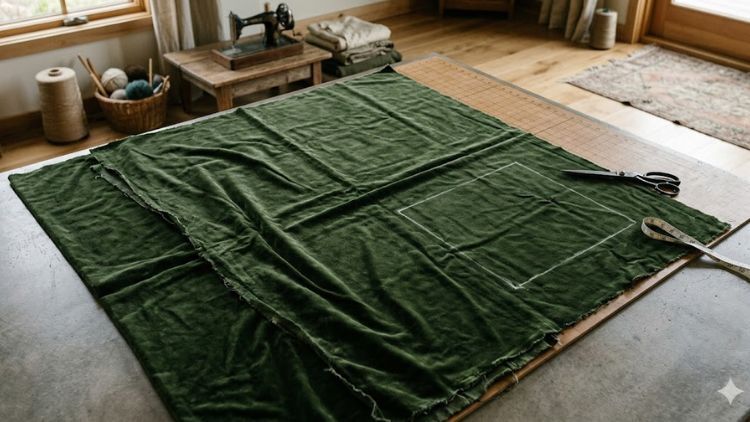
1. The “Thrift Store” Fabric Trick
Stop going to expensive fabric stores. Seriously.
I’ve found my best-looking pillow covers in the most random places : like old velvet curtains or thick linen tablecloths at thrift stores.
My Advice: Look for stuff like heavy linen or wool.
The DIY: I just cut out two squares from an old curtain I found for a few rupees. I used some fabric glue (because who has time to sew everything?), stuffed it, and it looks like a 2000-rupee designer cushion.
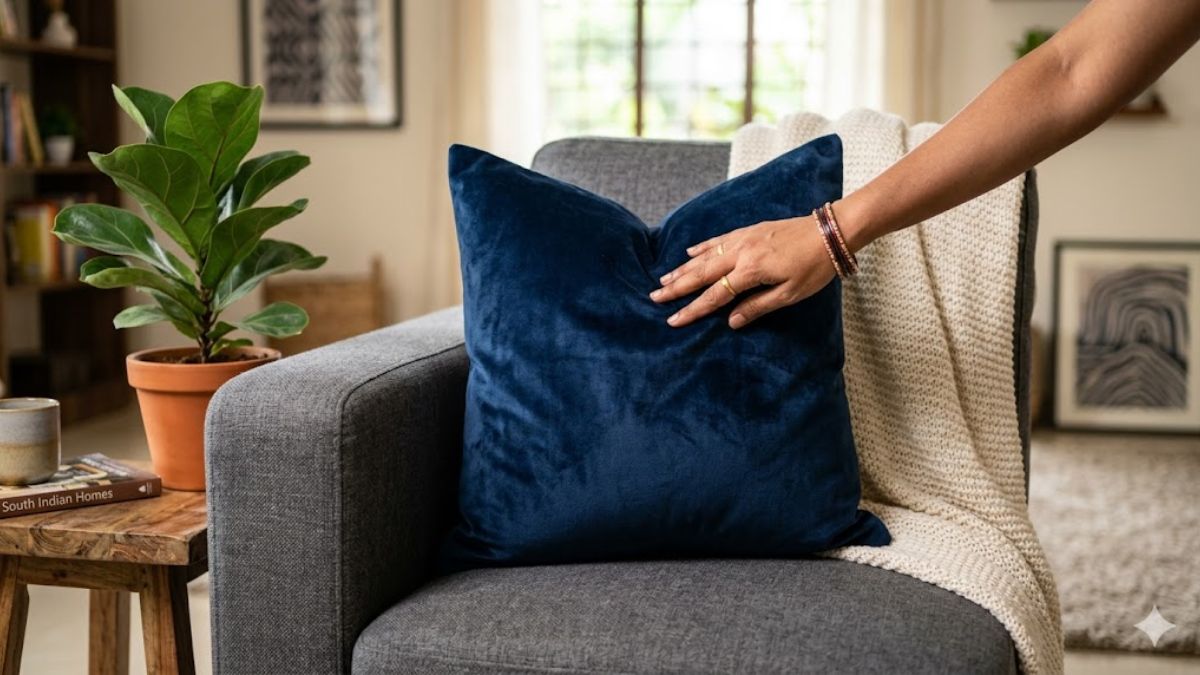
2. The Secret of the “Choppable” Insert
You know that little “dent” designers put in the top of pillows? That’s called the designer chop.
You can’t do that with cheap, bouncy polyester stuffing.
The Fix: You’ve got to use duck feather or a good down-alternative insert.
Why it works: These inserts actually hold their shape. When you “chop” them, they stay that way, and suddenly your sofa looks like it belongs in a 5-star hotel.
If you’re curious about why this technique is such a big deal in the design world, you can read more about the art of the designer pillow chop here.
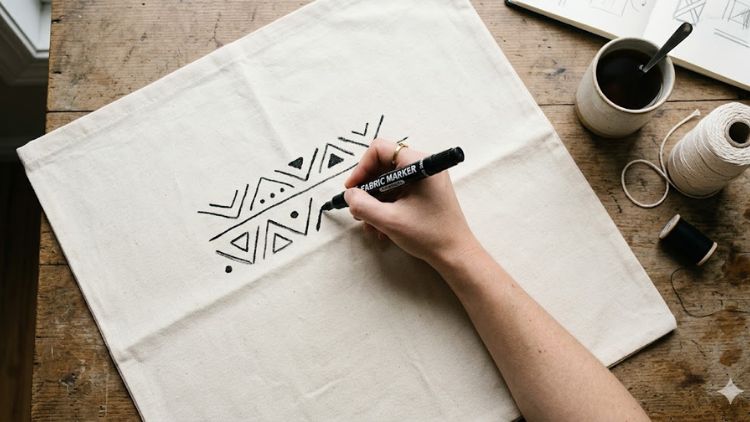
3. Making Your Own “Mudcloth” Designs
I used to see those African Mudcloth pillows online for crazy prices : like $100 or more.
I thought, “I can definitely make that.”
How I do it: Take a plain cream-colored cotton pillowcase. Grab a black permanent marker and just draw some simple triangles, lines, or dots.
The Secret: Don’t try to make the lines perfect. If they’re a bit shaky, it actually looks more expensive because it feels “hand-crafted.”
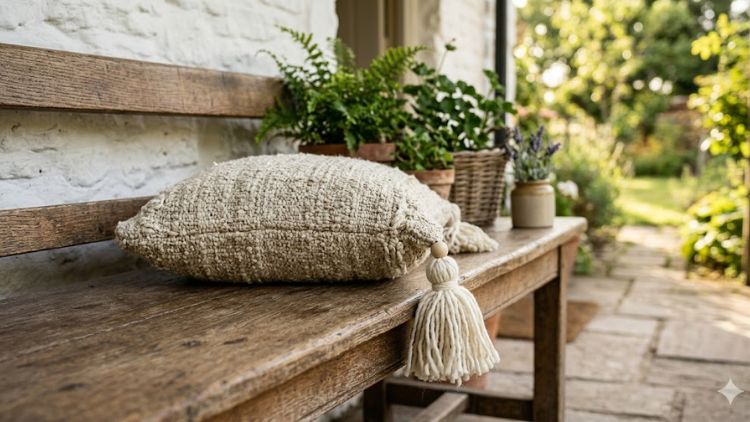
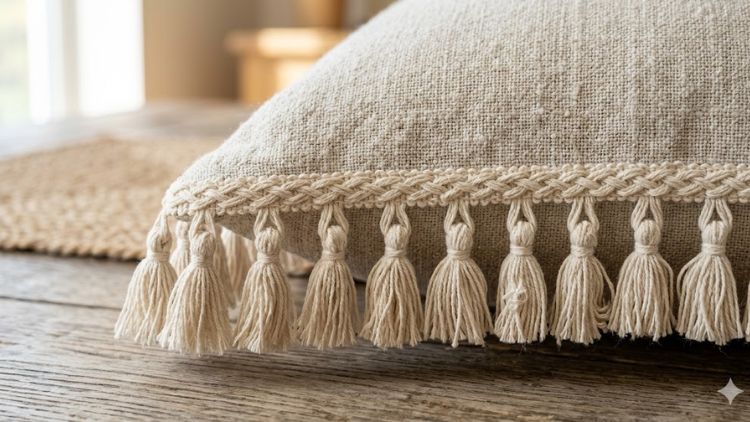
4. Adding Tassels for that “Boutique” Vibe
Plain pillows are just… boring.
Whenever I feel like my decorative pillows look too simple, I add tassels.
The DIY: Get some thick yarn, wrap it around your hand to make big tassels, and tie them to the four corners of your pillow.
The Result: It adds this “weight” and style that makes the pillow look like a custom piece from a fancy boutique.
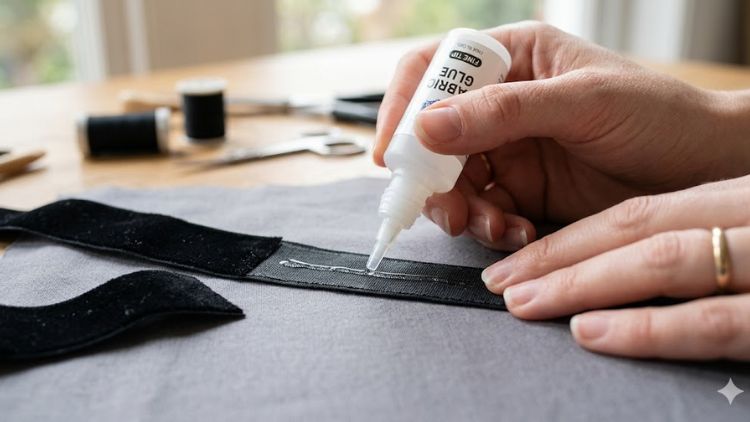
5. The No-Sew Ribbon Border
This is probably the easiest thing I’ve ever done to upgrade a room.
It takes like 10 minutes to create high-end decorative pillows with this trick.
What to do: Take a plain navy or gray pillow. Get some black velvet ribbon and glue it in a square shape about 2 inches from the edges.
Vibe: This is called an “Oxford border.” It’s exactly what you see in those high-end apartments in New York or London.
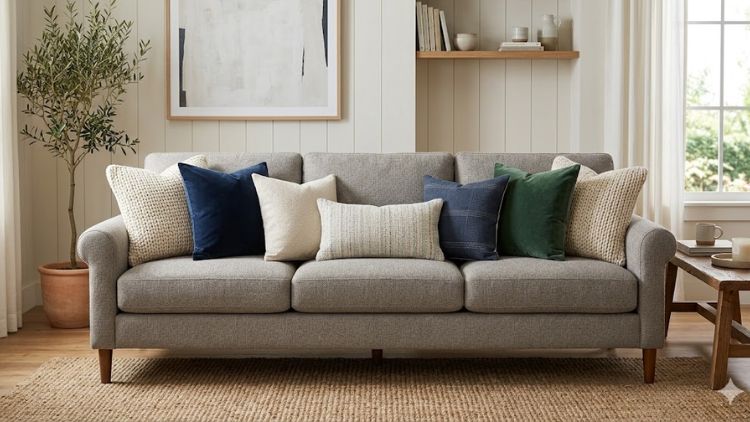
How I Style My Pillows (The Pro Way)
It’s not just about making the pillow; it’s about where you put it.
Don’t just throw them on the couch randomly.
The 2-2-1 Rule: This is my favorite formula. Two big pillows in the corners, two smaller ones in front, and one long “lumbar” pillow in the middle.
Mix the Textures: Don’t use the same fabric for everything. Pair a smooth velvet pillow with a rough chunky knit one. That contrast is what creates that expensive home look.
6. Using Old Leather Scraps
Leather just looks expensive, period.
If you have an old leather jacket that’s torn or a bag you don’t use, keep it!
The DIY: Cut a strip of that leather and glue it right down the middle of a plain fabric pillow.
The Look: It looks like those “mixed media” pillows you see in modern, luxury lofts.

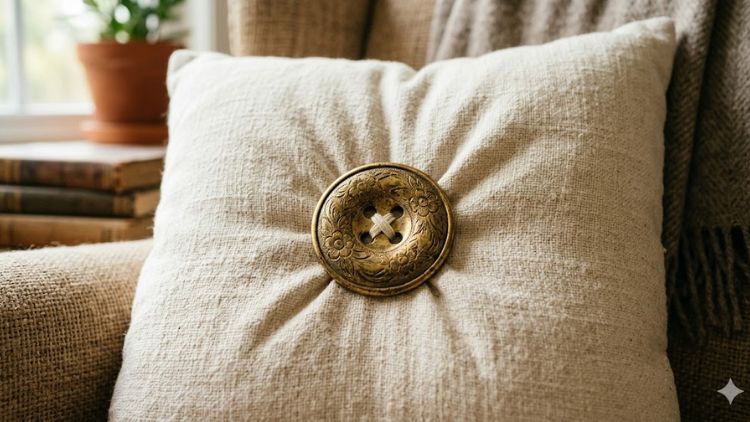
7. The “Hotel” Button Hack
Got a pillow that’s looking a bit sad and flat?
This is a life-saver for your decorative pillows.
The Hack: Find two big, vintage-looking buttons. Sew them right through the center of the pillow, pulling the thread really tight so it “pinches” the pillow.
The Effect: It gives it that “tufted” look, making it look more like a piece of furniture than just a soft bag.
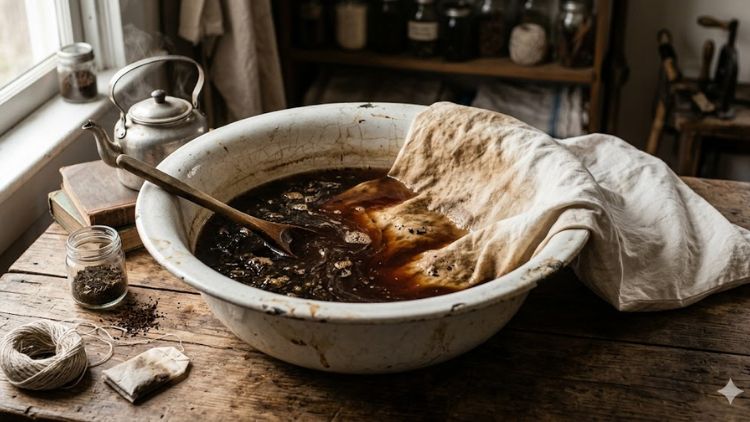
8. Coffee & Tea Dyeing (Nature’s Color)
I’m really not a fan of that bright, “bleached” white.
It looks a bit cheap and sterile to me.
The DIY: I literally soak my white cotton pillowcases in a strong pot of tea or coffee for an hour or so.
The Result: You get this gorgeous, vintage beige color that looks like organic linen. It feels much more high-end and “warm.”
9. Using “Trim” to Hide My Messy Sewing
Look, I’m not a professional tailor. Sometimes my edges are a bit messy.
The Fix: I buy some “fringe” or “piping” trim. I just glue it right over the seams.
Why: It hides all my mistakes and makes the pillow look like it was custom-ordered from a factory.
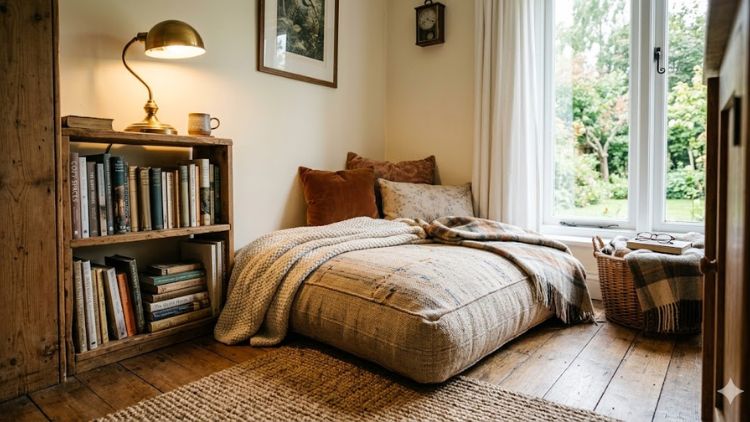
10. The Huge “Floor Pillow” Hack
Every cozy, rich-looking home has a spot to sit on the floor.
I made mine using old bed pillows.
The DIY: Take two of your old, flat bed pillows and stuff them both into one large Euro sham (those big square covers).
The Vibe: It makes this massive, overstuffed floor cushion that’s perfect for a reading corner.
For those seeking a professional finish, the Beckham Hotel Collection Euro Size Throw Pillows provide a plush, high-end feel that perfectly supports a designer look on any bed or sofa.
“Why wait? Upgrade your comfort today.”
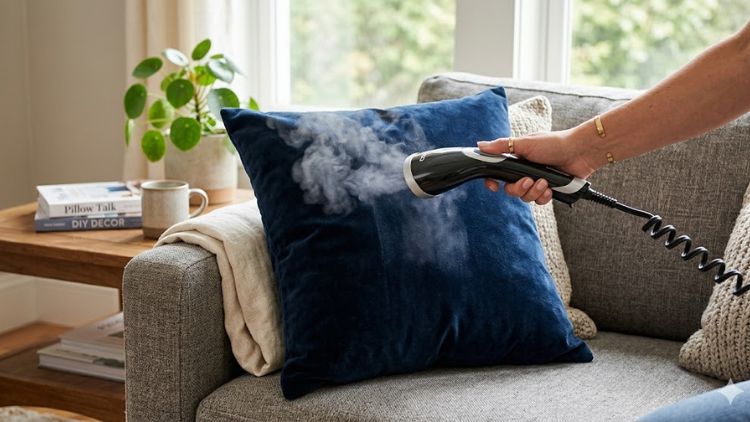
Keeping it Looking Good: Maintenance
You’ve made your decorative pillows, now don’t let them get ruined!
Steam them: Wrinkles make even expensive stuff look cheap. To keep your decorative pillows looking crisp and wrinkle-free, the Conair Handheld Garment Steamer for Clothes is a powerful 1875W tool that provides deep-penetrating steam in a portable design.
Flip them: I rotate my pillows every week so one side doesn’t get permanently flat.
The Dryer Trick: Every few months, put your inserts in the dryer with two tennis balls. It fluffs them back up like they’re brand new.
FAQ:
Q1: How can I really make my pillows look expensive?
Ans: Honestly? Focus on the “insides.” Toss that cheap poly-fill and get a feather insert. That’s how you get that “designer chop.” Also, go for heavy fabrics : thin stuff always looks a bit cheap for your decorative pillows.
Q2: What’s with this 3-5-7 rule?
Ans: It’s simple our eyes just like odd numbers. Don’t just put two decorative pillows; put three. On a big bed, use five or seven. It makes the room look like it was styled on purpose, not just by accident.
Q3: Does the 2-2-1 rule work for every couch?
Ans: Pretty much! It’s the easiest trick in the book. Two big ones, two small ones, and one long one in the middle. It adds depth, which is exactly what makes a room look “expensive.”
Creating a home that feels like a sanctuary doesn’t have to be a burden on your wallet.
Beyond just decor, if you’re looking for more ways to make your space feel peaceful, you might find this helpful: How to Feel Less Overwhelmed at Home.
A Small Note to My DIY Family
Listen, making your home look like a sanctuary shouldn’t be stressful or cost a fortune.
I’ve learned the hard way that it’s all about these tiny details.
When you walk into your room and see those pillows and you know you made them yourselfIt’s the best feeling in the world.
he world.Just try making one this weekend.
Find some old fabric, get a decent insert, and see how it goes.
So, what do you think? Which one of these budget-friendly upgrades will you be starting with?
Let me know!